TA的每日心情 | 开心
2021-12-13 21:45 |
|---|
签到天数: 15 天 [LV.4]偶尔看看III
|
|
Shoot on the moon and if you miss you will still be among the stars.
Caicloud Github :tensorflow-tutorialhttps://github.com/caicloud/tensorflow-tutorial
原本 tutorial 使用的 Tensorflow 最新版本是 1.4.0 ,本人使用的 1.5.0 版本,所以部分代码会略有不同,该笔记仅为个人学习,理解使用。如有错误,还望批评指教。—-ZJ
3.1 计算图的使用
- [code]import tensorflow as tf
- tf.__version__
[/code]
- [code]"""
- 3.12 计算图的使用
- """
- import tensorflow as tf
- a = tf.constant([1.0, 2.0], name="a")
- b = tf.constant([2.0, 3.0], name="b")
- result = a + b
- print(result)
- [code]Tensor("add:0", shape=(2,), dtype=float32)
- [code]print(a.graph is tf.get_default_graph())
[/code]
定义两个不同的图
除了默认的计算图,Tensorflow 支持通过 tf.Graph() 函数来生成新的计算图。
- [code]import tensorflow as tf
- g1 = tf.Graph()
- with g1.as_default():
- # 在计算图 g1 中定义变量“v”,并设置初始值为 0
- v = tf.get_variable("v", shape=[1], initializer=tf.zeros_initializer)
- g2 = tf.Graph()
- with g2.as_default():
- # 在计算图 g2 中定义变量“v”设置初始值为 1
- v = tf.get_variable("v", shape=[1], initializer=tf.ones_initializer)
- # 在计算图 g1 中,读取变量‘v’的值
- with tf.Session(graph=g1) as sess:
- tf.global_variables_initializer().run()
- with tf.variable_scope("", reuse=True):
- # 在计算图 g1 中,变量 ‘v’的值取值应该为 0,所以下面这行会输出[0.]
- print(sess.run(tf.get_variable("v")))
- # 在计算图 g2 中,读取变量‘v’的值
- with tf.Session(graph=g2) as sess:
- tf.global_variables_initializer().run()
- with tf.variable_scope("",reuse=True):
- # 在计算图 g2 中,变量 ‘v’的值取值应该为 1,所以下面这行会输出[1.]
- print(sess.run(tf.get_variable("v")))
[/code]
- [code]import tensorflow as tf
- a = tf.constant([1.0, 2.0], name="a")
- b = tf.constant([2.0, 3.0], name="b")
- g = tf.Graph()
- with g.device("/gpu:0"):
- result = a + b
- print(result)
- [code]Tensor("add_1:0", shape=(2,), dtype=float32)
3.2 Tensorflow 数据模型—— 张量
第 n 阶张量,理解为 n 维数组。
与 numpy 不同,Tensorflow 计算的结果不是一个具体的数,而是一个张量的结构,主要保存三个属性:名字(name),维度(shape)和类型(type).
注意:类型要匹配
- [code]import tensorflow as tf
- a = tf.constant([1.0, 2.0], name="a")
- b = tf.constant([2.0, 3.4], name="b")
- c = tf.constant([4, 5], name="c")
- d = tf.constant([4, 5], name="d", dtype=tf.float32)
- result = a + b
- # 类型不匹配 会报错
- # result1 = a + c
- # 指定类型 dtype=tf.float32 正常运行
- result2 = a + d
- print (result)
- print (result2)
- sess = tf.InteractiveSession()
- print(result.eval())
- print(result2.eval())
- sess.close()
- [code]Tensor("add_2:0", shape=(2,), dtype=float32)
- Tensor("add_3:0", shape=(2,), dtype=float32)
- [3. 5.4]
- [5. 7.]
add_2:0 :说明 result 这个张量是输出节点‘add’输出的第 3 个结果,编号从 0 开始
3.3 Tensorflow 运行模型——会话
使用 Session 来执行定义好的运算,Session 拥有并管理 Tensorflow 程序运行时的所有资源,当所有计算完成之后需要关闭会话来帮助系统回收资源,否则就可能出现资源泄露的问题。
3.3.1 创建和关闭会话
- [code]# 创建一个会话。
- sess = tf.Session()
- # 使用会话得到之前计算的结果。
- print(sess.run(result))
- # 关闭会话使得本次运行中使用到的资源可以被释放。
- sess.close()
[/code]
上面这种模式是,在所有计算完成之后,明确调用 Session.close() 函数来关闭会话,但是,若程序因异常而退出,Session.close() 函数可能就不会被执行到,从而导致资源泄露。
解决这个问题:则通过 python 的上下文管理器 with 来使用 Session
3.3.2 使用 with statement 来创建会话
- [code]# 创建一个 Session ,并通过 Python 的上下文管理器 with 来管理 Session
- with tf.Session() as sess:
- print(sess.run(result))
- # 不需要调用 sess.close() 函数,当上下文退出时,会话关闭和资源释放将会自用完成。
[/code]
3.3.3 指定默认会话
Tensorflow 会自动生成一个默认的计算图 (Graph),如果没有特殊指定,运算会加到这个默认的计算图中。
Session 有类似的机制,但是 Tensorflow 不会自动生成默认的 Session ,需要 手动指定。
tf.Tensor.eval() 可以用来计算一个张量的取值。
- [code]print(result)
- sess = tf.Session()3.3 指定默认会话
- with sess.as_default():
- print(result)
- print(result.eval())
- [code]Tensor("add_2:0", shape=(2,), dtype=float32)
- Tensor("add_2:0", shape=(2,), dtype=float32)
- [3. 5.4]
- [code]sess = tf.Session()
- # 下面的两个命令有相同的功能。
- print(sess.run(result))
- print(result.eval(session=sess))
- sess.close()
[/code]
3.3.4 使用 tf.InteractiveSession 构建会话
在交互式环境下,(Python 脚本 或 jupyter notebook),通过设置默认的会话方式,可以更方便的获取张量的取值。
- [code]sess = tf.InteractiveSession()
- print(result.eval)
- print(result.eval())
- sess.close()
- [code]<bound method Tensor.eval of <tf.Tensor "add_2:0" shape=(2,) dtype=float32>>
- [3. 5.4]
3.3.5 通过 ConfigProto 配置会话 Session
之前都是使用的默认的 session 的配置,我们也可以通过 ConfigProto 对 session 进行特殊的配置,来实现不同的需求。
- [code]config = tf.ConfigProto(allow_soft_placement=True, log_device_placement=True)
- sess1 = tf.InteractiveSession(config=config)
- sess2 = tf.Session(config=config)
- sess1.close()
- sess2.close()
通过 ConfigProto 可以配置并行的线程数,GPU 分配策略,运算超时时间等参数。
allow_soft_placement=True 时(默认为False),以下三个条件成立时,GPU 运算可以放到 CPU 上运行。
运算无法在 GPU 执行
没有指定的 GPU 资源,1. 没有 GPU 2.指定第二个,实际上只有 1个
运算输入包含对 CPU 计算结果的引用
log_device_placement=True 时(默认为 False 减少日志量),为 True时,日志中会记录每个节点被安排在哪个设备上以方便调试。
3.4 Tensorflow 实现神经网络
3.4.1 Tensorflow 游乐场及神经原理简介
Tinker With a Neural Network in Your Browser.:http://playground.tensorflow.org
通过 Browser 可以训练简单的神经网络,并实现了可视化训练过程。
中间省略看原书。
使用神经网络解决分类问题主要步骤:
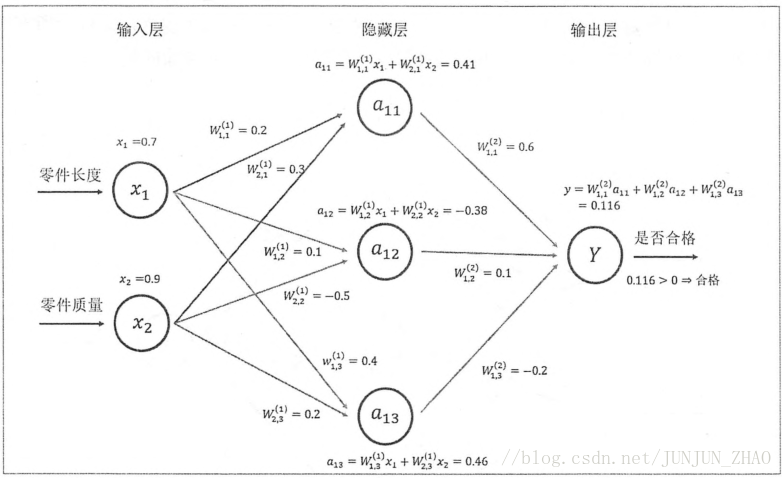
提取问题中实体的特征向量作为神经网络的输入。
定义神经网络的结构,并定义如何从神经网络的输入得到输出,也就是前向传播算法。
通过训练数据来调整神经网络中参数的取值,也就是训练神经网络的过程。
使用训练好的神经网络来预测未知的数据。
3.4.2 前向传播算法(Forward propogation)
介绍最简单的全连接网络结构的前向传播算法。略
3.4.3 三层简单神经网络
- [code]import tensorflow as tf
- # 1. 定义 w1, w2 两个变量,seed=1 设定随机种子
- # tf.random_normal 随机生成 2*3 大小的矩阵,服从正太分布 均值 mean,标准差 stddev = 1
- # 一定要注意矩阵的大小
- w1 = tf.Variable(tf.random_normal([2,3], stddev=1, seed=1))
- w2 = tf.Variable(tf.random_normal([3,1], stddev=1, seed=1))
- # 2. 将输入的特征向量定义为一个常量,x 维度(1,2)
- x = tf.constant([[0.7, 0.9]])
- # 3.定义前向传播算法的神经网络
- a = tf.matmul(x, w1)
- y = tf.matmul(a, w2)
- # 分别初始化 w1,w2 两个变量
- # 4.调用会话输出结果
- with tf.Session() as sess:
- sess.run((w1.initializer, w2.initializer))
- print(sess.run(y))
- # sess = tf.Session()
- # sess.run(w1.initializer)
- # sess.run(w2.initializer)
- # print(sess.run(y))
- # sess.close()
- [code]E:\ProgramData\Anaconda3\lib\site-packages\h5py\__init__.py:36: FutureWarning: Conversion of the second argument of issubdtype from `float` to `np.floating` is deprecated. In future, it will be treated as `np.float64 == np.dtype(float).type`.
- from ._conv import register_converters as _register_converters
- [[3.957578]]
注意:
运行上面代码时,出现下面的错误:
InternalError: Blas GEMM launch failed : a.shape=(1, 2), b.shape=(2, 3), m=1, n=3, k=2 [[Node: MatMul = MatMul[T=DT_FLOAT, transpose_a=false, transpose_b=false, _device=”/job:localhost/replica:0/task:0/device:GPU:0”](Const, Variable/read)]]
解决方法:
最后发现是运行着多个 jupyter notebook ,在学习练习的过程中,没有及时关闭 session 导致,看到系统资源占用比高达 75%,然后 将没用的都关闭后,就降到了 23%。
多半是 session 用毕没有及时 close, 导致系统和 GPU 的很大部分被占用过却没有归还, 当前资源便不够了; 或是多个 session 争用 GPU.
tf.random_normal 随机生成 2*3 大小的矩阵,服从正太分布 均值 mean,标准差 stddev
上面给 w1,w2 赋值时,使用的是 initializer ,当变量多的时候这样就会很麻烦,所以 以后可以使用 tf.global_variables_initializer() 函数来完成初始化所有变量的过程。
- [code]w1 = tf.Variable(tf.random_normal([2,3], stddev=1, seed=1))
- w2 = tf.Variable(tf.random_normal([3,1], stddev=1, seed=1))
- top = tf.global_variables_initializer()
- with tf.Session() as sess:
- sess.run(top)
- print("w1:\n",w1.eval(),"\nw2:\n",w2.eval())
- [code]w1:
- [[-0.8113182 1.4845988 0.06532937]
- [-2.4427042 0.0992484 0.5912243 ]]
- w2:
- [[-0.8113182 ]
- [ 1.4845988 ]
- [ 0.06532937]]
3.4.4 通过 Tensorflow 训练神经网络模型
使用 placeholder:
首先,每生成一个常量,计算图就会增加一个节点,一般来说,一个神经网络训练过程会经过几百万轮甚至几亿轮的迭代。若都是常量的话,则计算图会非常的大,且利用率低。
所以使用 placeholder ,相当于定义一个位置,这个位置中的数据,在运行程序时再指定。其类型不可变,维度可变。
- feed_dict={x:[[0.7,0.9]]}
- [code]# 定义 placeholder 作为存放输入数据的地方,必须指定类型,
- # 维度不一定要指定,但是,如果确定维度,可以避免出 bug
- x = tf.placeholder(tf.float32, shape=(1,2), name="input")
- a = tf.matmul(x, w1)
- y = tf.matmul(a, w2)
- with tf.Session() as sess:
- sess.run(tf.global_variables_initializer())
- # feed_dict 喂给的 输入数据
- print(sess.run(y, feed_dict={x:[[0.7,0.9]]}))
[/code]
- [code]"""
- 增加多个输入
- """
- x = tf.placeholder(tf.float32, shape=(3,2), name="input")
- a = tf.matmul(x, w1)
- y = tf.matmul(a, w2)
- with tf.Session() as sess:
- sess.run(tf.global_variables_initializer())
- print(sess.run(y, feed_dict={x:[[0.7,0.9],[0.1,0.4],[0.5,0.8]]}))
- [code][[3.957578 ]
- [1.1537654]
- [3.1674924]]
3.4.5 完整神经网络样例程序
在一个模拟数据集上训练神经网络,下面是一个完整的程序来训练神经网络解决二分类问题。
- [code]import tensorflow as tf
- # numpy 是一个科学计算的工具包,这里通过 numpy 工具包生成模拟数据集
- from numpy.random import RandomState
- # 定义训练数据 batch 的大小
- batch_size = 8
- # 定义神经网络的参数
- w1 = tf.Variable(tf.random_normal([2, 3], stddev=1, seed=1))
- w2 = tf.Variable(tf.random_normal([3, 1], stddev=1, seed=1))
- # 在 shape 的维度上使用 None 可以方便使用不大的 batch 的大小,在训练时把数据分成比较小的 batch
- # 将大量数据放进一个 batch 会导致内存溢出
- x = tf.placeholder(tf.float32, shape=(None, 2), name="x-input")
- y_ = tf.placeholder(tf.float32, shape=(None, 1), name="y-input")
- # 定义神经网络的前向传播过程
- a = tf.matmul(x, w1)
- y = tf.matmul(a, w2)
- y = tf.sigmoid(y)
- # 定义损失函数和反向传播算法
- cross_entropy = -tf.reduce_mean(y_ * tf.log(tf.clip_by_value(y, 1e-10, 1.0))
- + (1 - y_) * tf.log(tf.clip_by_value(1-y, 1e-10, 1.0)))
- train_step = tf.train.AdamOptimizer(0.001).minimize(cross_entropy)
- # 通过随机数生成一个模拟数据集
- rdm = RandomState(1)
- data_size = 128
- X = rdm.rand(data_size, 2)
- # 定义规则来给出样本的标签,x1 + x2 < 1 .为正样本 (1),其他为 负样本(0)
- Y = [[int(x1+x2 < 1)] for (x1, x2) in X ]
- # 创建 Session 来运行 tf 程序
- with tf.Session() as sess:
- # 初始化变量
- sess.run(tf.global_variables_initializer())
- # 输出目前(未经训练)的参数取值。
- print(sess.run(w1))
- print(sess.run(w2))
- print("\n")
- # 设定训练的 轮数
- STEPS = 5000
- for i in range(STEPS):
- # 每次选取 batch_size 个样本进行训练
- start = (i*batch_size) % data_size
- end = (i*batch_size) % data_size + batch_size
- # 通过选取的样本 训练神经网络,并更新参数
- sess.run([train_step, y, y_], feed_dict={x:X[start:end], y_:Y[start:end]})
- # 每隔一段时间,计算在所有数据上的交叉熵并输出
- if i % 1000 ==0:
- """
- 随着训练的进行,交叉熵是逐渐变小的,越小则越说明,
- 预测值与真实值之间的差距越小
- """
- total_cross_entropy = sess.run(cross_entropy, feed_dict={x:X, y_:Y})
- print("After %d training step(s), cross entropy on all data is %g" % (i, total_cross_entropy))
- """
- 训练完后,神经网络参数的值,w1 ,w2 的值已经发生了变化,也就是训练的结果。
- 它使得这个神经网络可以更好的拟合提供的训练数据。具有更好的泛化能力。
- """
- print("\n")
- print(sess.run(w1))
- print(sess.run(w2))
- [code][[-0.8113182 1.4845988 0.06532937]
- [-2.4427042 0.0992484 0.5912243 ]]
- [[-0.8113182 ]
- [ 1.4845988 ]
- [ 0.06532937]]
- After 0 training step(s), cross entropy on all data is 1.89805
- After 1000 training step(s), cross entropy on all data is 0.655075
- After 2000 training step(s), cross entropy on all data is 0.626172
- After 3000 training step(s), cross entropy on all data is 0.615096
- After 4000 training step(s), cross entropy on all data is 0.610309
- [[ 0.02476974 0.56948686 1.6921943 ]
- [-2.1977353 -0.23668927 1.1143897 ]]
- [[-0.45544702]
- [ 0.49110925]
- [-0.98110336]]
总结:
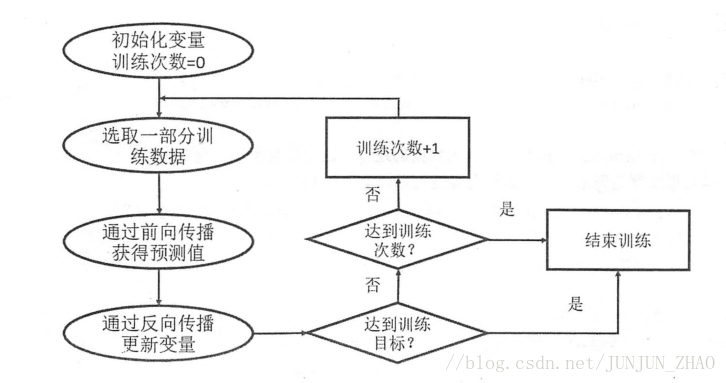
训练神经网络的过程主要可以分成 三步:
定义神经网络的结构和前向传播的输出结果
定义损失函数以及选择反向传播优化的算法(常用优化算法如下)
tf.train.GradientDescentOptimizer
tf.train.AdamOptimizer
tf.train.MomentumOptimizer
定义 Session 并在训练数据上反复运行反向传播优化的算法。
补充知识点:
batchsize:批大小。在深度学习中,一般采用 SGD 训练,即每次训练在训练集中取batchsize个样本训练;
iteration:迭代,1 个 iteration 等于使用 batchsize 个样本训练一次;
一个迭代 = 一个正向通过 + 一个反向通过
epoch:迭代次数,1 个 epoch 等于使用训练集中的全部样本训练一次;
一个epoch = 所有训练样本的一个正向传递和一个反向传递
举个例子,训练集有 1000 个样本,batchsize = 10,那么:
训练完整个样本集需要:
100次 iteration,1次 epoch。
|
|


 |手机版|Java学习者论坛
( 声明:本站资料整理自互联网,用于Java学习者交流学习使用,对资料版权不负任何法律责任,若有侵权请及时联系客服屏蔽删除 )
|手机版|Java学习者论坛
( 声明:本站资料整理自互联网,用于Java学习者交流学习使用,对资料版权不负任何法律责任,若有侵权请及时联系客服屏蔽删除 )


 发表于 2018-3-19 09:13:22